Mixing

- The Meter shows both peak and RMS output levels for the track. Peak meters show sudden changes in level, while RMS meters give a better impression of perceived loudness.
- The Volume control adjusts the track’s output level. With multiple tracks selected, adjusting the volume of one of them will adjust the others as well.
- The Pan control positions the track’s output in the stereo field.
- To mute the track’s output, turn off the Track Activator switch. With multiple tracks selected, toggling one of their Track Activators will toggle the others as well.
- The Solo switch (or pressing the S shortcut key) solos the track by muting all other tracks. With multiple tracks selected, pressing any of their Solo switches will solo all of them.
- Arm Recording button means the track can be used to record MIDI or audio.
If anything is missing, make sure the Mixer Selection buttons (I/O, S(end), R(eturn), M(ixer), D(elay), X(-fader) are all activated

Basic Gain Staging
- Turn every track all the way DOWN
- Bring up the most important track (usually your beat or your melody) to -12 dB
- Add an Audio Effect / Utility to the Master channel and set Gain to +6.00 dB
- Loop the loudest section of your song (chorus? drop?)
- Bring up the next most important track until the audio level is compatible (e.g. if you start with beat, the next could be bass; if you start with melody, the next could be beat)
- Continue this process for the other tracks, and other sections of your song
 |
| Ignore the settings in this diagram, this is just to show you what Utility looks like |
Basic EQ
Usually for all instruments which are not the Bass, we use EQ to filter out the low frequencies, so that they don't clash with the Bass or make the sound 'muddy'. We can do this by dragging an Audio Effect / EQ Eight onto each track, and using this setting
- Switch off all EQ points, leave only point 1
- Set Freq to 300 Hz
- Set filter type to low cut

Final Review
Congratulations on reaching the conclusion of the course! This is hopefully not the end, but just the beginning of your musical journey in creating more music.
Exporting your song to WAV / MP3
1. Select the entire arrangement and open the Export Audio/Video screen: CMD + Shift + R (Mac)/ CTRL + Shift + R (Windows).
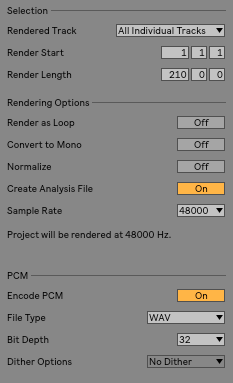
2. Set the Rendered Track dropdown to Master (to make one WAV or MP3 file that you can share)

3. Make sure that Render Start and Render Length span the entire length of the arrangement, from the beginning to the very end, regardless of where an individual instrument begins or ends in the arrangement.
4. Turn off Render as Loop, Convert to Mono and Normalize.
5. If the mix engineer is using Live too, turn on Create Analysis File, then when they import the files all the settings will remain the same. If not, there's no need to create an analysis file.
6. Set the sample rate to a minimum of 48,000 samples (or higher if you were already recording with a higher sample rate).
7. Enable Encode PCM, then select either Wav or AIFF. That will create a high quality audio file which can be around 30MB for 3 minutes. If you want to make an MP3 audio file instead (smaller at around 3MB for 3 minutes), select Encode MP3.
8. It's best to export at a bit depth of 32 bits, to avoid doubling dithering of the audio. The mix engineer should take care of the dithering on their end. See the audio fact sheet for more details.
9. Press Export to export your song.

Comments
Post a Comment